The main function of ELB (Elastic Load Balancing), is to direct and route traffic destined to your fleet of EC2 instances across an even distribution, which helps to maintain high availability and resilience of your environment. AWS supports two types of ELB:
- Classic load balancing (external, web-facing)
- and Application load balancing (internal, DB-facing)
The classic load balancer routes traffic based on application and network information, whereas the application load balancer routes traffic at the application level, managing multiple applications running on the same EC2 instance. Essentially, the 2 forms of LBs operate in the same manner.
The main import of an ELB is that it can help maintain high availability of applications running on your EC2 resources.
Typical problem resolved by ELB:
Imagine you have a single web server receiving traffic from your customers visiting your website. Over time, this traffic increases and you decide to add another web server to manage the load. You now need a mechanism to direct traffic between the two servers equally to handle the incoming load of requests. This is where your classic load balancer comes in.
Any traffic directed at your website is sent to a ELB, which will then distribute the requests across both web servers. Should one of your web servers or instances fail, the ELB will detect this and stop sending traffic to that particular instance. However, traffic will continue to be sent to your remaining fleet. This ensures the availability of your web servers remains up and running.
As traffic increases, you can deploy more and more web servers that can all communicate with the same ELB. Again, this increases availability of your web service. To enhance resiliency even more, you can even configure your ELB to load balance your traffic across multiple availability zones, just in case one AZ goes down within your AWS, your web infrastructure will continue to function.
Setting up an ELB is straightforward:
- Define the load balancer
- Assign security groups
- Configure the security settings
- Configure some health checks
- Add your EC2 instances
- Add tags
When creating an ELB within your virtual private cloud, you have two options. Either an internal or external load balancer. Let’s consider the following network diagram to help explain the difference between the two.
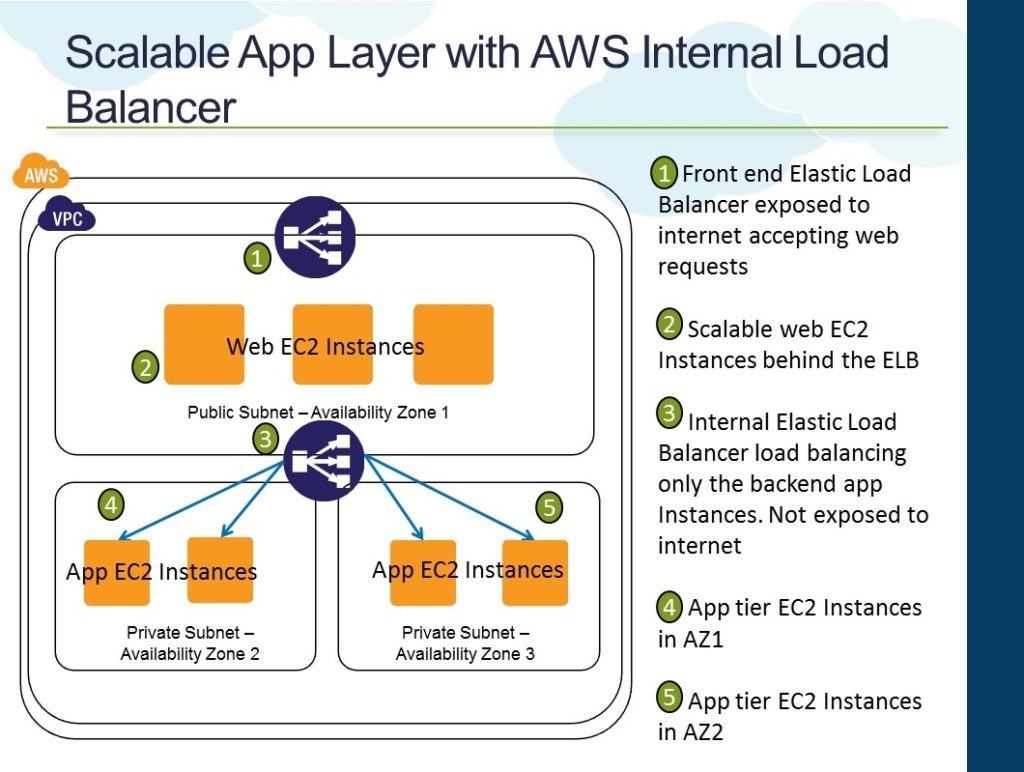
An external load balancer will have a public IP address and will typically sit in front of your web servers, receiving traffic from the internet, and then distribute those requests to your fleet of web servers.
An internal load balancer will have an internal IP address and can only be accessed from within your private network. In this diagram, we have an internal ELB between the web servers and the two databases. The web server will send data to the databases via the internal ELB. This will then manage the traffic to the database layer.
Once you have selected either an internal or external load balancer, you can then select which availability zones you would like the ELB to distribute traffic to. For best practice in high availability reasons, it’s a good choice to select at least two different availability zones just in case AWS experiences an AZ outage. However, you must ensure that the instances that you want to load balance exist in these availability zones.
One component that’s required by a ELB is a listener configuration. A listener configuration enables the ELB to check for connection requests both from end clients to your ELB and also from your ELB to your backend instances over a specified protocol and pull. The protocols that are supported for this configuration are HTTP, HTTPS, TCP, and SSL. For an external ELB, your listener configuration would likely be HTTPS as the protocol for additional security. To manage instance level security to and from your ELB, security groups are used in much the same way as in normal EC2 instances.
If you selected either HTTPS or SSL in the listener configuration for an external load balancer, you’ll be prompted to configure an additional security policy. This allows you to deploy an SSL certificate on your load balancer to help decrypting requests before passing them onto your web server fleet of instances..
Next configure a health check on your ELB. This health check monitors the health of any instance associated with the ELB to ensure that it is only routing requests to instances that are functioning correctly. If a health check fails for an instance, then that instance is automatically removed from the ELB. The health check is carried out by performing a ping using a specified protocol to the instance.
For example, performing a ping over port 80 to the /index.html file on the web servers. If a response is received, then the instance is classed as operational and traffic can be routed to that instance. If a response is not received over a specified timeframe and a number of attempts, then the instance will be marked as unhealthy and no further requests will be routed to that instance.
Once your health checks are configured, you then need to select which instances you would like added and associated to the ELB. If you are configuring an external ELB, then you’d select your web servers here. If you do not have your EC2 instances deployed at this point it doesn’t matter, as you can add these at a later stage. The final configuration element of your ELB is to configure any tags that you want.
Tags are key-value pairs that are used to add metadata to your resource for enhanced management as your environment grows. For example, you could add a key of Name with a value of My External Load Balancer. Or a key of Project, and a value of Web Application Infrastructure.
We can now combine the ELB with Auto scaling.
Auto-scaling is a mechanism that automatically allows you to increase or decrease your resources to meet demand based off of custom-defined metrics and thresholds. If you had one EC2 instance acting as a web server, you can make a rule within Auto-Scaling, that when the average CPU reaches 75% utilization, you want to automatically deploy another EC2 instance to enable you to distribute traffic between the two servers, bringing the average CPU percentage down. Therefore, load balancing the traffic evenly and reducing the chance of one web server failing or slowing down due to the high CPU usage. Similarly, when the average CPU usage reduces to 20%, then you automatically want an EC2 instance to be terminated as the demand has dropped.
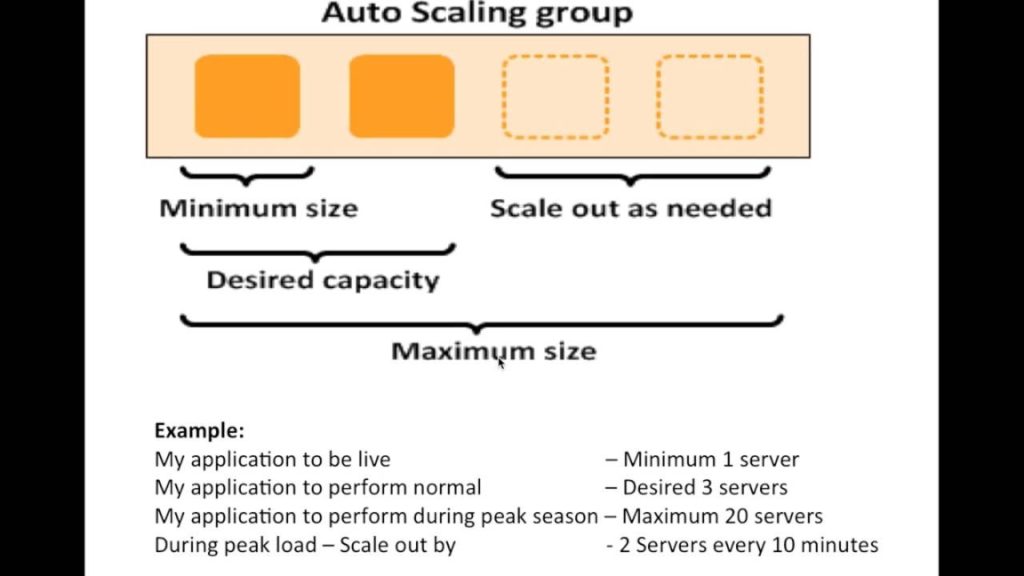
Auto Scaling can achieve this through defined metrics. You can increase, scale out, and decrease, scale in, the size of your EC2 fleet. This has many advantages, and here are some of the key points.
As this provides automatic provisioning based on custom defined thresholds, your infrastructure will start to manage itself, preventing you from having to monitor and perform manual deployments. This will provide a better experience for your users. If there is always enough capacity within your environment, it’s unlikely the end user will experience performance problems which may prevent them from using your services again.
With the ability to automatically reduce the amount of resources you have when demand drops, you will stop paying for those resources. You only pay for an EC2 resource when it’s up and running. When you couple auto scaling with elastic load balancing, you get a real sense of a scale of what a flexible architecture for your EC2 Compute instances.
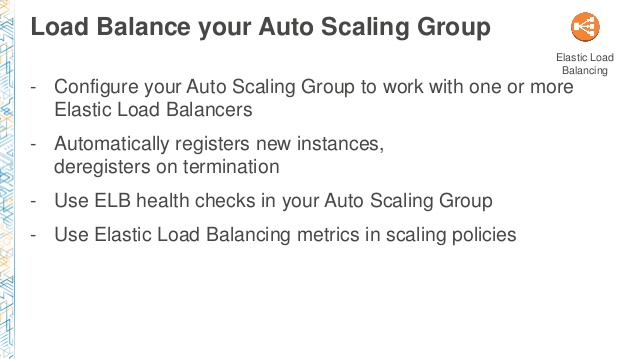
Once you have your auto scaling group configured, you can attach your ELB to the group. ELB will automatically add any EC2 instances to the ELB as the group grows in size. As well, they would also be removed from the ELB when the group scales back in again. There are two steps to configuring Auto Scaling.
- The first is the creation of a launch configuration
- and the second part is the creation of the auto scaling group
The launch configuration is simply a template that the Auto Scaling group uses to launch new instances. This launch configuration identifies the following: which AMI to use, the instance type, if and when public IP addresses should be used for your instances, user data required for automatic scripting on first boot, the storage volume configuration and which security groups should be used. Without this launch configuration template, Auto Scaling would not know which instance it was launching and to which configuration norms.