AWS CloudFormation is an infrastructure-as-code tool that defines resources and their configurations in a standardized template — either a JavaScript Object Notation (JSON) or YAML format. In general, YAML is the preferable option, as it’s more concise; JSON requires a much higher number of characters. YAML also supports the ability to add comments, which JSON does not.
Admins can version and maintain CloudFormation templates as part of a suite of operational components. A key concept in CloudFormation is a stack. A stack is an AWS resource that is created in addition to the resources configured in the template. A CloudFormation stack groups, launches and manages all the resources defined in a template. Even though a stack could technically contain as little as a single resource, its optimal use case is one where multiple resources launch together.
The most common use case for CloudFormation is to group all or most components of a full application environment within a single stack. This simplifies the launch of multiple environments across deployment stages.
While CloudFormation has a variety of features and capabilities, there are two that are particularly important.
- Parameters. Admins can configure resources using dynamic values that they specify upon stack creation or updates. This provides flexibility when using the same template to launch multiple stacks across different deployment stages.
- Internal references. Once resources are created, they can be referenced internally within the CloudFormation stack. For example, users can create a security group in a template and configure an EC2 instance in the same template to use the recently created security group via internal reference.
Use CloudFormation to deploy an EC2 instance
There are required parameters to define before you can launch the CloudFormation stack that will deploy the EC2 instance. These parameters include the following:
- the Amazon Machine Image (AMI) ID the new EC2 instance will use;
- the EC2 instance type;
- the VPC ID and subnet ID where the instance will be launched;
- at least one security group ID; and
- an EC2 key pair name.
For this example, we will assume a key pair was already created and a security group ID is already known, prior to creating the EC2 instance.
Step 1. When defining a CloudFormation template, it is mandatory to specify a Resources block and declare all the relevant AWS resources under it. The most basic block to launch an EC2 instance in CloudFormation would look like this:
Resources:
MyNewEC2Instance:
Type: AWS::EC2::Instance
Properties:
ImageId: <ami-id>
InstanceType: <ec2-instance-type>
SubnetId: <subnet-id>
SecurityGroupIds:
– <security-group-id>
KeyName: <ec2-key-name>
In addition to the essential configurations shown above, there are more than 40 parameters that one can configure when launching an EC2 instance. The following are important parameters that are highly recommended to include:
- BlockDeviceMappings. Enables users to allocate more storage space than specified in the AMI. For example, most AWS Linux AMIs come with a default of 8 GB, which might not be enough for many applications.
- DisableApiTermination. Prevents users from accidentally terminating an EC2 instance.
- IamInstanceProfile. Associates an identity and access management profile to the EC2 instance, eliminating the need to configure AWS credentials in local files or environment variables inside the instance. This provides a secure way to grant AWS permissions to processes running inside an EC2 instance.
- NetworkInterfaces. Defines the allocation of a public IP address to the new instance, depending on whether the instance should be accessible from the internet or only within a VPC.
Step 2. Once you complete the template, create the CloudFormation stack. This can be done by clicking on the Create stack button from the CloudFormation console.
You can also launch a CloudFormation stack using the AWS Command Line Interface or SDK. These options fully automate resource creation and minimize manual intervention.
Step 3. Select the option Template is ready and Upload a template file.

Step 4. Define the stack name and, if there is a parameters section in the template, specify those parameters.
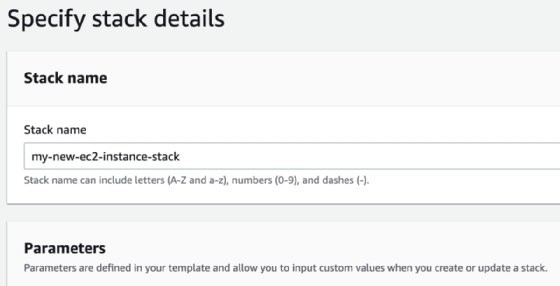
Define the stack name and specify parameters.
Next, select advanced options for the deployment. These options include resource tags, IAM roles, stack failure options — rollback or preserve resources — and termination protection. Next, there is a confirmation page that includes a button to create the stack.
Once you create the stack, it will appear as CREATE_COMPLETE in the CloudFormation console. There are several tabs in the console that provide more information about the stack.

Additional information in tabs